Figure 1
This is a brief but detailed tutorial on using Adobe® Photoshop® to take advantage of the PNG format's alpha-transparency feature to, basically, make grayscale images that will look halfway decent on a variety of different background colors.
I wrote it down because once when I wanted to do it myself, all I could find were pages that assumed you were already a Photoshop expert, or pages that only described the very simple one-level kind of transparency that even GIFs can do. So I thought I might save you the trouble if you ever need to do the same thing. I wrote it down as a story, because I'm a weblogger and I like to talk too much.
So the other day I was playing around CSSifying my weblog, making alternate stylesheets and so on, and I noticed a problem. Up until the CSSification, my weblog had always been in a brown color scheme, and in keeping with that scheme I had generally recolored all my images to be nice and brown.
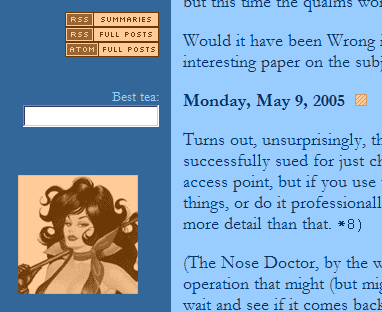
Once the stylesheets were working, I naturally designed an alternate stylesheet that wasn't brown. But the results were less than optimal (see figure 1) because of course the images were still brown, not being magically recolored by the stylesheet.
(Actually the blue and brown don't really look bad together, but it's the principle of the thing; I wanted to make a stylesheet that would produce an all-blue page.)
I looked around for solutions, and found that there's a whole set of CSS filters (that only work in IE), one of which ("filter: gray") will make any image into a grayscale image. That's great for grayscale pages, but doesn't help with blue.
Friend Ian suggested that I could do some magic with the alpha channel transparency in PNG files, to make images that would adapt themselves automagically to their background colors.
This sounded good to me, so I poked around the Photoshop menus and the Photoshop help, and when those were unhelpful I poked around the web, but all I found were pages that either assumed I was already a Photoshop expert and casually said things like "put your image into an alpha channel" without saying how, or described only the very simple process of turning a single background color transparent.
What I needed was a description for the casual Photoshop user of how to make an image variably transparent; in particular, for my purposes, to take a grayscale image and make a new image that was fully transparent where the grayscale was lightest, fully opaque where it was darkest, and middling opaque in between.
I eventually found one page that came sort of close, and by fiddling with its instructions I was able to put together a reasonably simple formula for navigating through Photoshop's incredibly baroque user interface to make this work.
Here we go. (Note that if you want this to work you should follow the instructions exactly at least the first time, as Photoshop is quite demanding about some things. Once you've convinced yourself that it works as described, you can play with variants. This is done with Photoshop 7.0 under Windows XP; elsewhere your mileage may vary.)
First, open your image in Photoshop. I'm assuming you're starting with a simple image like a JPG or a PNG or whatever; if you have a Photoshop PSD file, you can either use File / Save For Web to make a simple image file and then work with that, or you can try to wing it with the PSD.
You'll probably want to work with a copy to avoid accidentally zorching the original, so do Image / Duplicate, press Enter to accept the default name on the popup, switch to the original image, and do File / Close (feel free to use other controls wherever I specify a menu thing, like the liddle X rather than File / Close, if you'd rather).
Look at the "Layers" tab. (By default it's in the lower right; if you're unlucky you moved it somewhere else by accident months ago. If you can't find it, go into the "Window" menu and make sure "Layers" is checked, and that might surface it.) If the "Layers" tab lists just one layer called "background", make that into a real (non-background) layer by double-clicking on it (naturally), and pressing Enter to accept the default name. If you already had a single non-background layer, great. If your image started out with multiple layers, you should flatten it first or something, I dunno.
Now convert the image to grayscale with Image / Mode / Grayscale (and "OK" at the warning prompt). Even if it's already a grayscale image you may well have to do this just to make sure Photoshop thinks of it as one.
Put a copy of the image on the clipboard by doing Select / All and then Edit / Copy (or your favorite shortcut keys to that effect).
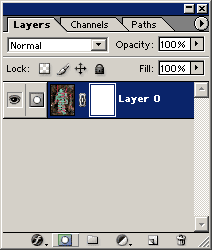
Back in the "Layers" tab there should be a single non-background layer listed. Click on the line about that layer in the "Layers" tab to make sure that it's selected, and then add a layer mask to it by clicking on the corresponding microicon at the bottom of the "Layers" tab (see figure 2; the "Add Layer Mask" microicon is second from the left at the bottom of the picture).
Now open the "Channels" tab. (With luck it's right next to the "Layers" tab; otherwise hunt around and make sure it's checked in the Windows menu.) There should be two channels listed, one (perhaps called "Gray") with a little eye next to it, and one (perhaps called "Layer 0 Mask") with no little eye. Click on the little empty box to the left of the eyeless channel, and an eye should appear. Then click on the eye next to the other channel, and that eye should disappear. (Your image will also disappear from its window; that's okay.)
Do Edit / Paste. Your picture will reappear (although now you're looking at the copy of it that's sitting in the alpha channel).
Do Image / Adjustments / Invert. The visible image (which is the alpha channel one) will invert black-for-white. (This is necessary because transparency goes up with the blackness of the image in the alpha channel, whereas we want the whiter places in the original image to be the more transparent.)
Go back over to the Channels tab, and click on the empty box where there was originally an eye (next to the channel that may be called "Gray"). That eye should reappear, and the visible image should now look odd and checkerboardy and pinkish.
Now do File / Save For Web. In the next dialog, select PNG-24 under "Settings", and make sure the "Transparency" box is checked. Press "Save", give it the name of the file you want it to make, press the final "Save", and you're done!

The resulting PNG file will be more transparent where the original image was light, and less transparent (and more black) where the original was dark. It will therefore look more or less correct on any light-colored background; figure 3 shows the same PNG made by this process on three different light backgrounds.
For placing on dark-colored backgrounds, you can use the CSS "background-color" attribute of the img element to give the image itself a light-colored version of the background color, or (if you know you'll always be using the image on dark backgrounds) do the steps above but leave out the "Image / Adjustments / Invert" step to get an image that's transparent where the original was dark, and white where the original was light. Up to you (the two effects look quite different, so play around and see what you like).
Simple, eh? *8)
Once you've mastered this, you can play around with variations; fiddling with the brightness and contrast in the alpha channel, and even drawing there with various drawing tools (always being careful to have only the layer mask's little eye turned on in the Channels tab), gives you very fine control over the transparency of each bit of your final image.
Did this discovery actually solve my problem, you ask? Well, in fact it didn't. When I brownify images for my weblog I don't map them into a color space that goes linearly from light brown to black, I map them into a color space that goes linearly from light brown to dark brown. On a blue version of the weblog I'd like them to go from light blue to dark blue (not light blue to black). It makes a surprising amount of difference (compare the brown Wanda in figure 1 with the top one in figure 3; while the alpha-transparent one looks okay, it doesn't have the rich brown tone of the color-specific one). Maybe I've just messed up somewhere, but as far as I can tell there's no way to make a PNG that adapts to the background color in this more complicated way. Next I'm going to learn about alpha-blending algorithms and see if there's anything interesting to be found there...